How to: Make a texture roller for clay
This project is instant gratification. Something that is not that common in the world of clay. With this texture roller, you can use it as soon as the hot glue has cooling, which is very fast. It’s a great project to do in a class, or on your own so you have a custom tool that no one else has.
Supplies:
- a roller of some sort (cut up pieces of PVC, empty rolls of tape, couplings for PVC, plastic rolling pins from the dollar store or craft store).
- a sharpie.
- a hot glue gun. They only cost a couple of bucks.
- extra hot glue sticks.
Draw your pattern onto the rolling pin. It’s easier to work out the pattern before with a Sharpie than it is later with the hot glue. Think about some sort of connected pattern, they tend to have the best results. And don’t go overboard with the lines, you’ll regret it later. And remember that the hot glue line aren’t going to be perfect, so just go with the imperfection.
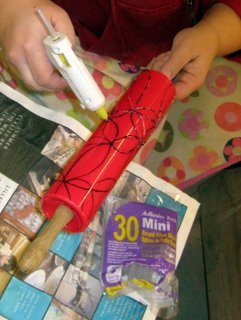
While you’re drawing, plug in your hot glue gun. Make sure that you do it on a surface that you can toss when done, like newspaper or cardboard. When you’re done drawing on your design, start gluing. Be a bit heavy handed with the glue. If the lines are too thin, they won’t show up on the clay as well.
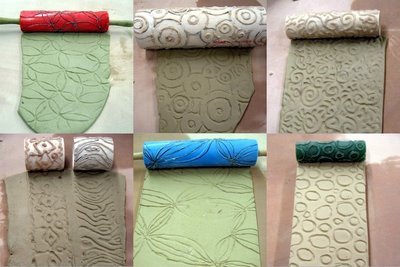
After the glue seems cool, start rolling away… The first attempt might stick a bit, but after there is some dusty clay on the roller, it won’t really stick.
If you’re not a hand builder, a nice use for one of these textured slabs is in the bottom of a thrown and altered casserole.

love this… i am going to try it this week-end.
OH MY GAWD – now why didn’t I think of this? Yesterday, I was using some texture plates – and contemplating making some bisque texture rolling pieces or buying some pre-made ones. I even broke out some of my lino-cut plates from school to use as texture.
Thanks for the tutorial – I’m going to give this a shot today!
You rock, Emily!
freaking awesome! thanks so much! can’t wait to give this a try
You are brilliant! Thanks for sharing!
Hi Emily
For the throwers out there:
If you use a small print roller with a handle to put the design on, you can hold this against the side of a freshly thrown pot while supporting the pot wall from the inside. I use this type of decoration a lot in my pottery classes.
Hello I’m from Italy. Thank you for this good idea. I did this last week and I made a very good job!!! Excuse me for english!
Sonia
This is great, we learned this technique at a Lana Wilson Workshop using PVC, the rolling pins are a better idea! Keep the ieas comin’
thismuds4u.blogspot.com
I am a middle school art teacher in Connecticut. My students and I tried this idea on pieces of cardboard rolls from wrapping paper and cardboard cylinders from rolls of tape. It worked awesome. They turned out great!!!! The kids loved creating original-non-store-bought texture. Wow! Thanks for the idea!!! I cant wait to take pics.. when I do I will send a link to my site to check them out!
Kelly Murphy- Smith Middle School Glastonbury CT
Oh, what a cool idea! Thanks for sharing this neat trick, I can’t wait to try it.
Fantastic idea! Can’t wait to show my ceramics classes!
Interesting to know.
Having trouble laying down the glue on the roller,I cut wall paper to the exact dimensions of the roller.I laid the paper out flat,transferred a design to the paper,laid down the glue,and then wrapped the paper around the roller.It was much easier for me to work on a flat surface.This way I can print out designs and then transfer them to the flat paper.This gives me much more control of the glue gun resulting in a neater design(s).
This is JUST what I have been looking for.. thank you for sharing !
I’m thinking of buying a textured roller. This idea will definitely save my wallet.
[...] BUT when I am in the mood to pick up dry crusty “doh” off the carpet, I can get really playful with my boys making some art. I found this neat idea on how to make a textured roller with a hot glue gun here. [...]
[...] from Pottery Blog did a how-to on making Custom Texture Rollers for Clay. I came across this quite old post (from 2007!) while I was researching some stuff about clay. [...]
What an awesome project! Just wanted to let you know I featured it today on “You Sew Rock Me Fridays” at sewrockin.com.
You can see it here: http://www.sewrockin.com/2011/11/11/you-sew-rock-me-fridays-4/
Jamie @ Sew Rockin’
what a great way to reuse kid rollers that the handles have fallen off and i don’t want to repair anymore. the results of your work look beautiful.
Thank you for the great tut. I hope you don’t mind me adding this to my Pinterest Polymer Clay ideas board.
wow! i love it! thanks for sharing! :)
This is fabulous! Can’t wait for the new school year to begin so my students can use these… BTW… I have ceramic tiles that stay with my glue guns for resting them on… works much better than paper :)
[...] potteryblog.com via Natosha on [...]
[...] If you're into pottery, polymer clay, or any other sort of clay-related crafting, here is an idea that you will definitely want to try! Emily at Pottery Blog posted these wonderful textured clay rollers to add to your clay tool arsenal! It's a nice way to add your own unique touch to a project – and it's truly unique because nobody else will have a roller that is exactly the same as yours. It's also a quick and easy project to complete, something that is rare in a discipline like pottery where patience is a key requirement. And at this price, you can afford to make a different texture tool for every project! [how to make a textured clay roller] [...]