
How to make a bat gripper
I went through a period of time early in my ceramics career where I was a tool minimalist. It's something that I think every potter should go through. I had 3 tools that I would use: a wire tool, a wooden knife tool, and a basic wooden rib. I was even flexible with what tool filled those 3 slots. I like the idea that it was really about how I moved the clay, not the tools or gadgets. And I also like the idea that wherever I was in the world, I would be able to throw a pot- regardless of the tools. This idea has also led me to using many different types of clay, and to throw on different types of wheels. It makes me a portable potter. So even though that's my philosophy on clay tools...
..I LOVE TOOLS! I know how to work with the fewest possible tools, but I really enjoy working with many tools. It can allow you to do something with greater ease, or achieve a new surface, or just make you happy because of its cleverness.
At some point over the last 5 or 6 years a little boom of new tools popped up, many as a side business from a potter who was making cool tools for themselves. I'm happy to be a potter during this period. I love trying out different things, and sometimes (many times) I get hooked on one. I am going to be sharing with you some tools that I really love, and some tools that I make myself in the tool section of this blog.
 I loved it for teaching when I was working on a wheel that had worn holes for bat pins to stop the wobble. I also loved it under the little square bats that tend to lift a little when making a tall piece in my studio. But it had a problem where it would start to erode over time (you can see that from the pictures). And then they stopped being made (the material was no longer manufactured). So I had to do something to fill my need of a new Bat Grabber and here is what I did...
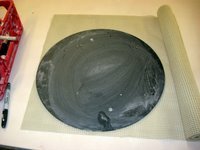
With a Sharpie, I used a bat to trace out the circle and to draw in the placement of the bat pin holes. I made both a 14" circle and a 12" circle. Just because.


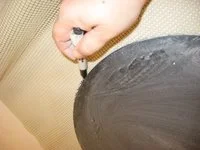
Then you cut it out, including the holes.
To use it: dip it in some water and squeeze out the excess. Then stick it on your wheel head, and use a bat on top. Circular, square, plastic, wood or foam covered. They will all stay a little bit more secure with this do-it-yourself bat gripper.


 (Don't forget to make pots when you're not making tools...)
..I LOVE TOOLS! I know how to work with the fewest possible tools, but I really enjoy working with many tools. It can allow you to do something with greater ease, or achieve a new surface, or just make you happy because of its cleverness.
At some point over the last 5 or 6 years a little boom of new tools popped up, many as a side business from a potter who was making cool tools for themselves. I'm happy to be a potter during this period. I love trying out different things, and sometimes (many times) I get hooked on one. I am going to be sharing with you some tools that I really love, and some tools that I make myself in the tool section of this blog.
A tool that I really dug was the Bat Grabber.

I got a roll of rubbery shelf liner. The cheapest one I could find; but I think that any would work. You can probably use a rug pad too.


With a Sharpie, I used a bat to trace out the circle and to draw in the placement of the bat pin holes. I made both a 14" circle and a 12" circle. Just because.


Then you cut it out, including the holes.
To use it: dip it in some water and squeeze out the excess. Then stick it on your wheel head, and use a bat on top. Circular, square, plastic, wood or foam covered. They will all stay a little bit more secure with this do-it-yourself bat gripper.


